It becomes very easy to create organization chart in the later versions of Microsoft Office Suite. You can do it in Word, Excel, or PowerPoint by using the SmartArt features. Most people do it in PowerPoint for presentation purposes, but you can follow the same steps and use the same commands in Word or Excel. Since PowerPoint is the preferred tool, so I’ll illustrate the steps with that instead of Word or Excel.
When you open the PowerPoint, the defaulted theme is the “Title Slide”. It is recommended that you change it to the “Blank” theme. Please right click the slide, choose “Layout”, and then “Blank” theme.


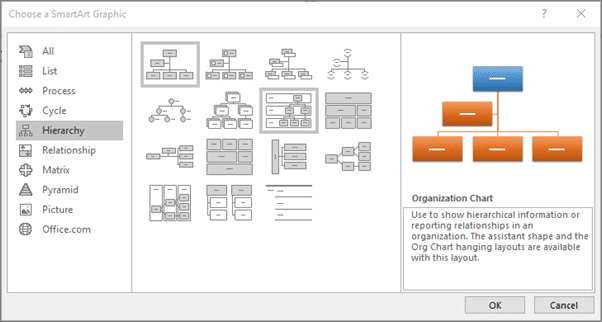
Click the “Insert” tab on the ribbon, choose “SmartArt”, then choose “Hierarchy” and “Organization Chart”. There are many other choices under “Hierarchy”, like the ones with pictures, names, and different shapes. It is up to you what you prefer. For simplicity purpose, I chose the simplest form for illustration purposes.

Start typing in the text like CFO, Secretary, CFO, COO, CIO, etc. You can type in the blue text box in the organization chart or type in the layout area (area stating “Type your text here). If you type in the layout area, the related blue text box will be updated simultaneously. If you type in the blue text box, the related layout area will be updated simultaneously as well.


If you need more hierarchical levels in your organization chart, you can choose “Add Shape” to add more blue boxes. Let’s say Controller, Finance Manager, and Treasurer are all reporting to the CFO. You can click the CFO blue box and choose “Add Shape” and then “Add Shape Below”. If you need to add 3 positions under the CFO, you need to choose “Add Shape Below” 3 times. Please type in the job titles of the three positions.


Let’s say the Treasurer got demoted. The Treasurer is now reporting to the Finance Manager instead of the CFO. Click either the Treasurer blue box or the Treasurer on the layout area and choose “Demote” command on the ribbon.


Let’s say it is a mistake. The Treasurer should be reported to the Controller instead of the Finance Manager. You can first click the “Undo” button (or CTRL+Z keys). Then click the Treasurer item (either in the layout area or the related blue box) and choose the “Move Up” command. You can see from the below illustration that the “Treasurer” is now positioned between Controller and Finance Manager. Now you can choose the “Demote” command and see that the Treasurer is now under the Controller instead.


The below example shows that the Finance Manager got promoted and now reports directly to the CEO instead of the CFO. Click the Finance Manager and choose the “Promote” command.
When you are done with the organization chart, you can view it with “Slide Show” command to view it.
You can use the “Right to Left” command to move the Finance Manager to the desired position.
The left illustration is the completed organization chart.