When you work on Microsoft Access queries or SQL queries, it is necessary to understand the concept join properties. There are inner join, left outer join, and right outer join. In Microsoft Access, queries are created with inner joins by default. Inner join produces a result with data appear in both tables that match with each other. So you might find that the results from using inner joins are not what you want. To grab the concept more easily, let’s look at the below illustration with only two tables.
I have the below 2 tables with parent-child relationship. The parent table is the “Salesperson table” with more static data such as Salesperson’s codes and names. The child table is the “SalespersonPerformance” table which contains more dynamic data such as monthly sales amount. There are 5 salespersons in the company. However, only 3 salespersons made sales in December. If you use a query with inner join, you may notice that the query only shows the sales results of the 3 salespersons. The sales result of the remaining 2 salespersons will not show up because they made no sales in December and therefore, there were no entries for those 2 salespersons to the SalespersonPerformance table.


If you see the query in the SQL view, you can see that the join is an inner join.

If you want to have all the salespersons showed up the report, you need to use an outer join instead of inner join. In our example, the left table (I.e. “Salesperson” table) is the table that we want all its data to show up, so we need to use a left outer join. You can change the join property by following the below steps. Please note that if you are a savvy SQL query modeler, you can change it directly in the SQL view.

Step 1: Open the query and choose the “Design View”
Step 2: Right click on the connecting line between the 2 tables and choose the “Join Properties”.

Step 3: Change the choice from 1 to 2 and click OK button.

Now you should be able to see the illustration of the connection line changed to an arrow. If you view the query in SQL view, you can see that the query is now in LEFT (outer) JOIN.


The result of the query.
If you want the blank cells to show up as zero, you can replace the “DecemberSale” field in the query by using a formula as below instead and the result will come up as zero instead. Use ISNULL function to check if the December Sales is blank or not. If the field is blank, replaces it with zero.
Sales: IIf(IsNull([DecemberSale]),0,[DecemberSale])

Right Outer Join shares the same logic as Left Outer Join. The only difference is that you get all records of the right table, instead of the left table as in the Left Outer Join.
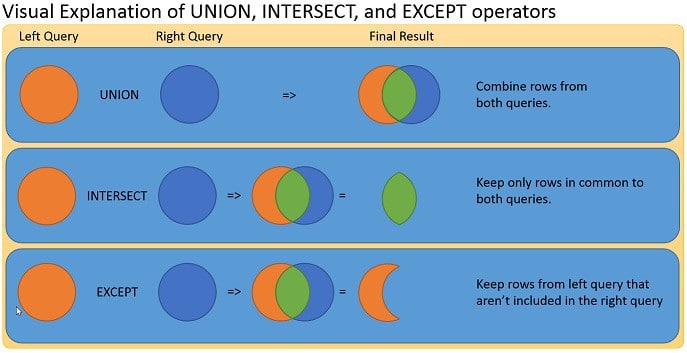
UNION
Union query combines the data of two tables. The number of the fields of the two tables can be different, but the name and the data type of the fields of the two tables must be exactly the same. Otherwise, the union will not work. In the below example, the FinanceEmployee table has exactly the same names (EmployeeCode and EmployeeName) as the Salesperson table. In addition, the data type of the fields must be exactly the same too. If the EmployeName field is text in the Salesperson table, it has to be the same as the field in the FinanceEmployee table. If the two tables have the same number of fields, you can use SELECT *. But if the two tables have the different number of fields, you must type in the field names of the tables that you want to union (e.g. SELECT fieldname1 ,fieldname2 …). The fields that only exist in one table but not the other table cannot be union.

Please follow the below steps to create a union query.
Step 1: The union query cannot be created by using the query wizard. You must use write the SQL query by yourself. Instead of going to the “Create” tab, you need to click the “Design” tab and then choose the “Union” icon. A blank SQL page will appear and you need to type in the SQL statement by yourself. The syntax is like this:
SELECT [fieldname1, fieldname2 …..] FROM [table1]
UNION
SELECT [fieldname1, fieldname2 …..] FROM [table2];
If the two tables have exactly the same number of fields, you can make it simple by typing this syntax:
SELECT * FROM [table1]
UNION
SELECT *FROM [table2];

Step 2: Click the “View” button at the upper right ribbon to see the result of the union query.

After you save the union query, it should appear on the navigation pane as below.
The union query is most useful for the tables that are created by “Create-table” queries. Sometimes you need to create tables to store interim data from queries before you can proceed to further process data with another query or by using Visual Basic modules. The union query comes in handy sometimes when you need to combine the queried results before doing further processing.
The result of the query.